





So, you’ve made an agent - congratulations!
You’ve wrestled with edges and nodes, stitched together tools and states, and maybe even sprinkled in some retrieval and structured outputs. Your graph is alive. It thinks. It reacts. It plans.
But then real question hits - how do you get this thing out into the world?
Because the truth is you can’t just shove your carefully constructed LangGraph agent into a serverless function and call it a day. This isn’t 2024, and if that’s still your instinct… well, you clearly didn’t read my last blog about why Databricks serving endpoints and Apps are the way forward.
But you’re here now, which means you’re ready to do it the right way. So let’s talk about how to turn your graph into a production‑ready, scalable, governable Databricks served agent endpoint!
And although we often work with LangGraph as our standard, this workflow applies just as well to other frameworks such as agents built on the OpenAI API or DSPy.
Turn Your Graph Into a ResponsesAgent
Your LangGraph agent may work brilliantly as a collection of Python objects, but Databricks Model Serving doesn’t know what to do with a graph of nodes and tools. What Model Serving does understand is a ResponsesAgent - a standardised interface with predictable inputs and outputs.
Turning your graph into a ResponsesAgent gives you:
- A consistent request/response schema
- Compatibility with MLflow tracing
- Automatic integration with Agent evaluation tools
- A contract that Model Serving knows how to host and scale
In practice, the easiest and least disruptive way to do this usually means wrapping your graph runnable into a class that implements a .predict(ResponsesAgentRequest) method. The predict method is standard, and the request object carries your inputs, any custom metadata, and optional extra context such as the current user (which is automatically passed through by the Databricks Playground, and can be passed through “manually” by any upstream apps you have designed).
Inside this wrapper, your graph can extract all your inputs from the ResponsesAgentRequest object and runs as it normally would, but now it just lives inside a well-defined wrapper with a standardised interface
Test Your Agent in a Deployment Notebook
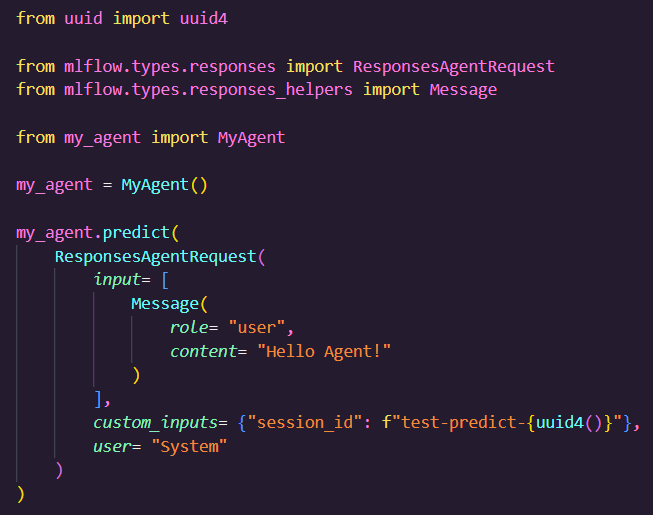
The next step is to create a notebook, import your shiny new agent class, and give it a trial run.
To do this, you can just emulate what Databricks is going to do – invoking the .predict() method. Testing your agent in this manner will:
- Trigger full MLflow tracing
- Log all intermediate steps
- Capture the execution graph
- Provide latency insights
- Show exactly what’s going on inside your agent at every step
Which makes this the perfect chance to:
- Validate that your graph still executes end‑to‑end
- Catch all the “oops, forgot to rename that” or “why is it still calling the old tool?” situations
- Try out passing through extra context via custom_inputs
If your agent works here, with MLflow capturing every step, then you’re already most of the way to deployment!
Log Your Agent as an MLflow Model
This is where things get interesting, and a lot more LLMOps-y.
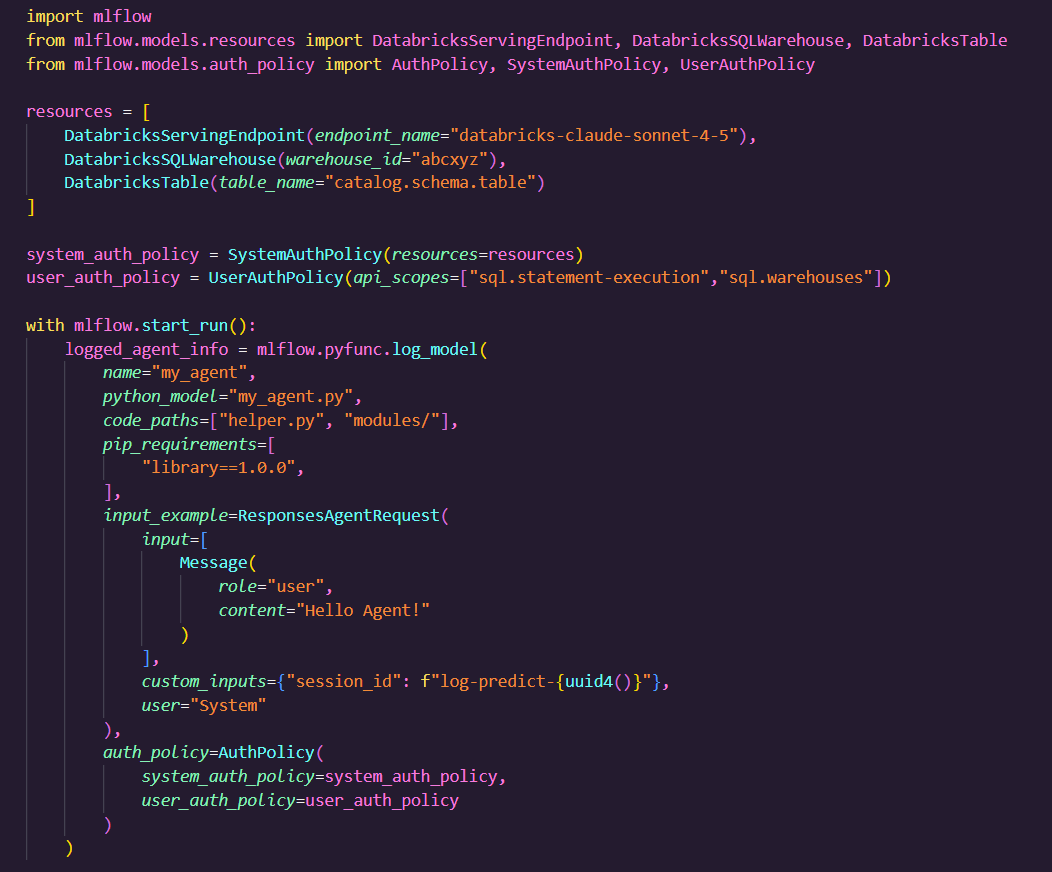
At this stage, you will use the mlflow .log_model() method to package your agent as a deployable MLflow model. However, unlike a simple LLM call or sklearn model, an agent may depend on other Databricks resources such as vector search indexes, UC tables, Genie spaces, embedding endpoints, other model endpoints, and so on.
Side note: Your model may also rely on other modules and files, so it is crucial that we also tell MLflow to include any related files or directories as code paths!
This is why MLflow introduces the idea of model resources and auth policy.
When logging your agent, you need to explicitly declare:
- Which Databricks resources the agent uses
- What level of privileges it should inherit
- How authentication passthrough should work at the point of serving
The default (and recommended) approach is that the deployed agent runs under its own autogenerated Service Principal. This SP lives outside of the “Workspace Users” group and is entirely managed by Databricks – you will never be able to access or edit anything about this SP. It will only have access to resources you declare during log_model(), and crucially it can only be granted permissions that the person running the notebook already has.
Databricks then automatically generates, manages, and rotates short-lived Machine-to-Machine OAuth tokens for your agent to use, allowing for secure and uninterrupted access to resources.
It is also worth noting that there is a ceiling for what authentication an agent can grant itself during this step. For example, even if you have MANAGE permissions for a UC table, the agent can only ever grant itself SELECT and no more, which could be an issue if your agent attempts to write to a table at any point!
The full list of permissions an agent can grant itself are give below:
|
Resource type |
Permission |
Minimum MLflow version |
|
SQL Warehouse |
Use Endpoint |
2.16.1 or above |
|
Model Serving endpoint |
Can Query |
2.13.1 or above |
|
Unity Catalog Function |
EXECUTE |
2.16.1 or above |
|
Genie space |
Can Run |
2.17.1 or above |
|
Vector Search index |
Can Use |
2.13.1 or above |
|
Unity Catalog Table |
SELECT |
2.18.0 or above |
|
Unity Catalog Connection |
Use Connection |
2.17.1 or above |
|
Lakebase |
databricks_superuser |
3.3.2 or above |
All of which can be found in the Databricks docs.
If you require resource access beyond the level available through automatic authentication, then you can explore enabling:
- On-Behalf-Of (OBO) auth, whereby the agent acts AS the user invoking the agent.
- Providing OAuth credentials so that the agent can act under a user managed Service Principal.
- Providing a PAT token so that the agent can act as a specific user with a set token. This is very much not recommended though as it removes many of the benefits which Databricks Model Serving is meant to deliver.
If you choose to go with OBO authentication for any resources, then you will need to employ two different authentication policies. This means that rather than just providing a list of required resources, you will need to specify the Databricks REST API scopes that your agent calls on the user's behalf. This ensures the agent follows the principle of least privilege and reduces the chance of unauthorised actions or token misuse.
Side Note: Interactions with Databricks resources require use of the Workspace Client Databricks SDK for authentication to be passed through properly. Depending on how your graph has been constructed, some of your interaction methods with Databricks resources may not be supported and may need to be edited to utilise the Workspace Client instead!
Evaluate the Agent Using MLflow AI Agent Evaluation
Before you unleash your agent on your users, you need to know:
- Is it accurate?
- Is it safe?
- Does it hallucinate?
- Does it follow instructions?
- Does it meet the standards for your use case?
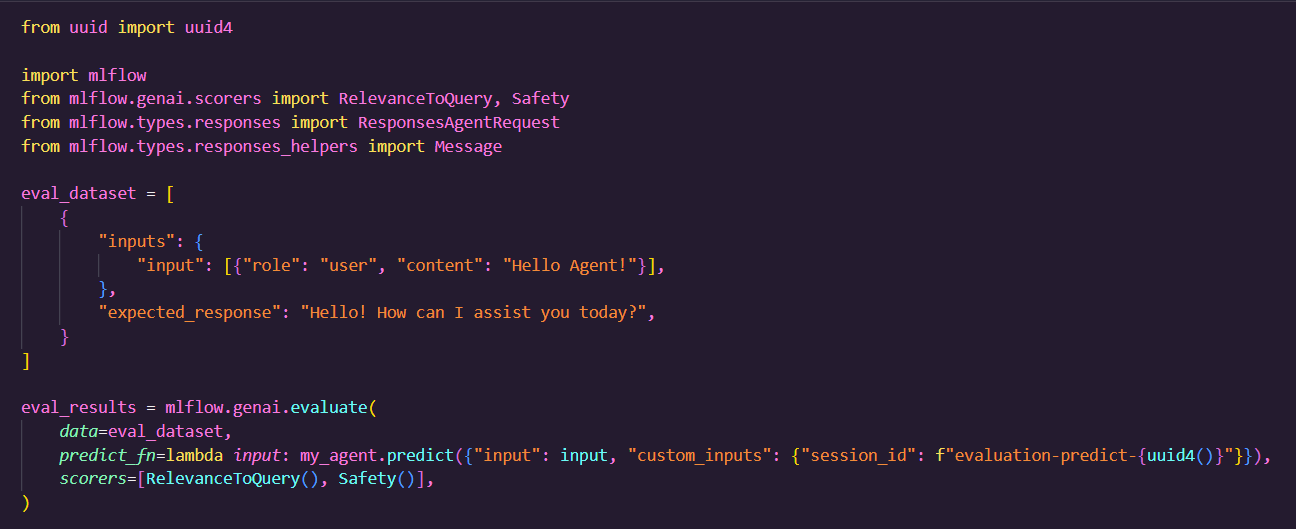
All of which can be answered using agent evaluations! Agent Evaluation lets you:
- Define expected outputs
- Score your agent across multiple dimensions
- Assess outputs for harm and quality
- Use built‑in AI judges or human SMEs
- Track quality metrics over time via MLflow
This step in the process is therefore a crucial check to ensure the agent you are deploying is behaving as expected against your own set of evaluation metrics. This is how you turn your agent from “it works on my machine” into “it meets our enterprise QA standard.”
Pre‑Deployment Validation
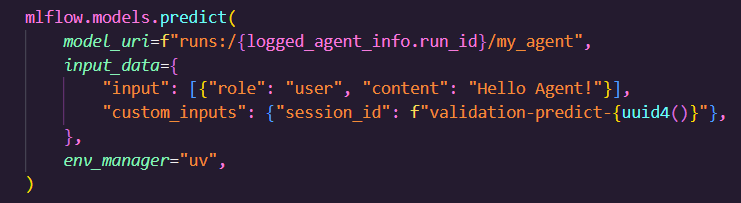
Before registering or deploying the model, you can run a pre‑deployment validation against your logged model – once again using the mlflow.models.predict() API.
This ensures:
- Your model is serializable at this point in the process
- Your inputs and outputs adhere to the expected schemas
- Your environment and dependencies resolve correctly
- The agent behaves as expected inside the MLflow model wrapper
If something is going to break when it comes to the deployment, this is where you want to find it - not after your endpoint starts returning 500s in front of your users!
Register Your Agent to Unity Catalog
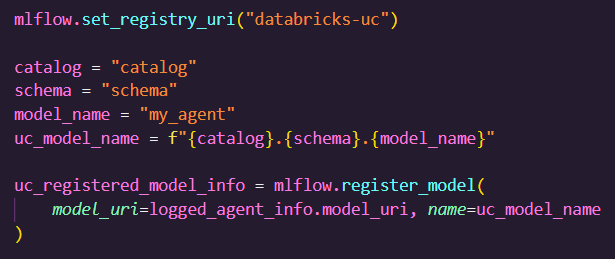
Once validation passes, you can finally register your agent as a UC model, which allows you to fully leverage Unity Catalog features such as:
- Centralised versioning
- Fine‑grained permissions
- Lineage tracking
- Auditability
- Multi‑workspace governance
- Future deployment flexibility
These are the main benefits of deploying agents with Databricks and Unity Catalog, and allows your MLflow model to become a well governed asset in your data platform.
Deploy to a Databricks Model Serving Endpoint
And here’s where the magic happens!
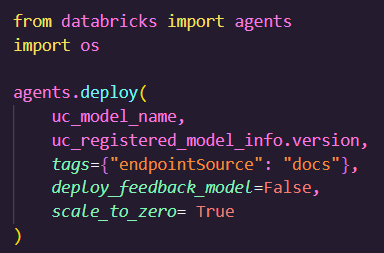
With your UC‑registered agent ready, you can deploy it to a Model Serving endpoint, which as we’ve previously discussed will give you a plethora of benefits such as:
- Autoscaling
- Monitoring
- AI Gateway integration
- Secure authentication
- Version routing
- Built‑in observability
Once deployed, you can give it an immediate test by hopping over to the Databricks AI Playground and beginning a new chat session. Don’t forget to pass through any expected custom inputs too!
This is the moment your LangGraph creation stops being “a cool notebook demo” and becomes a real asset with a real endpoint, which you can share with SMEs for further testing and feedback, or integrate it directly into your application!
Wrapping Up
Building a great agent is only half the journey. Deploying it securely, scalably, and responsibly is where the real AI engineering begins.
By following the steps in this guide, you can give your agent the production‑grade home it deserves, ensuring it is:
- Governed
- Observable
- Reproducible
- Scalable
- Secure
- Ready for real users
Now go forth and deploy with confidence — your graphs are about to become something grand.
Got a question, or just want to chat to us more about this kind of stuff? This is our bread and butter - drop us a message.