


Introduction
Genie Spaces have quietly become one of the most useful things you can put in front of a business user. Point one at a few Unity Catalog tables, add some instructions and sample questions, and as if by magic users can now ask questions of their data in plain English. However, the catch has always been operationalising them.
Building a space in the dev workspace is easy, everything can be done through the UI and is intuitive to refine. But getting that exact same space into QA and prod, under version control, without a human clicking through the UI three times and praying the configurations match, has been a genuine sticking point for the Databricks community for a long time.
Luckily though, the dawn of DAIS26 has ushered in with it the Databricks CLI v1.3.0, wherein Genie Spaces are finally the first-class Databricks Asset Declarative Automation Bundle (DAB) resources they've always been destined to become. Which means you can finally define a space as code, commit it to git, and deploy it across environments alongside all of your other bundle resources!
This post walks through getting a space under version control and out the door, and, just as importantly, the sharp edges you'll still need to plan around.
Getting Started
This guide assumes you're already comfortable with the basics of DABs and have a workspace where you can create Genie Spaces. You'll need:
- Databricks CLI v1.3.0 or above. Genie Space bundle support landed in 1.3.0, so anything older won't see the resource type. Check with
databricks --version, and if you're behind then check out the docs on how to upgrade on your machine. - A configured auth profile for your dev workspace (
databricks auth login, or a profile in~/.databrickscfg). - Permission to create and edit Genie Spaces in that workspace.
One thing worth knowing before we start: Genie Spaces can only be deployed with the bundle direct deployment engine, which is the default for new bundles created with CLI v1.3.0+. If you're working in an older bundle you may need to opt into it, but it isn't something you'll need to worry about for now if you're starting a new bundle from scratch.
Build The Space In The UI
The cleanest way to get a space into code is not to hand-write JSON. It's 2026, nobody handwrites code anymore, let alone JSONs. The best way to get started is in fact to build a working space in the UI first, then pull it into source control. You get a space you've actually tested, plus an exact serialised definition, all through a clean and easy to use interface.
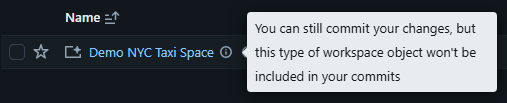
Open up your workspace, preferably in a git-backed repo and create a new Genie Space, selecting the NYC taxi sample (samples.nyctaxi.trips) so you've got something concrete to follow along with. Add an instruction or two just so we have more to see trickle through later.
You'll notice Databricks tells you the space can't be put under version control from here. That's a current limitation, which we'll deal with in a few steps time.
Set Up Your Bundle
If you've played with DABs before, then you'll be very familiar with this step, this is where you create a databricks.yml at the root of your repo. To begin with, keep it minimal, just enough to point at a dev workspace and pull in resource files. We'll evolve it as we go:
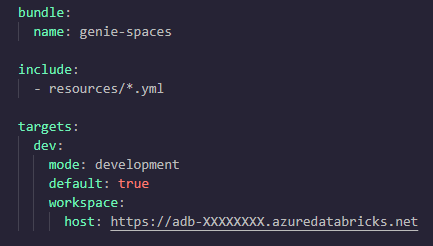
Something to particularly mention here is that mode setting - mode: development - on the dev target. Development mode, among other things, guards the names of your deployment so you don't clash your colleagues. It prefixes resource names with [dev <your-name>]. That matters more than usual for Genie Spaces because, as we're about to see, deploying a space is creating a space, and you really don't want two people fighting over the same one.
Generate A Local Resource
Grab the Space ID. You'll find it in the URL when the space is open (.../genie/rooms/<space-id>), or under the space's Configure → About tab. Then in your local CLI, from the repo root run:
databricks bundle generate genie-space --existing-id <space-id>
This writes two files that together define the space:
- resources/<space_title_slug>.genie_space.yml
- src/<space_title_slug>.geniespace.json
Note how they both share the same key (ie, the name/slug before the file extension). This key has to be unique to these two as it's how they'll be identified as paired together by the bundle later on.
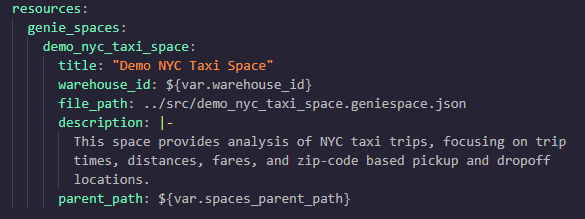
The .yml is the bundle resource. When generated, it'll have hardcoded values for your warehouse ID and the workspace path the space currently lives in:
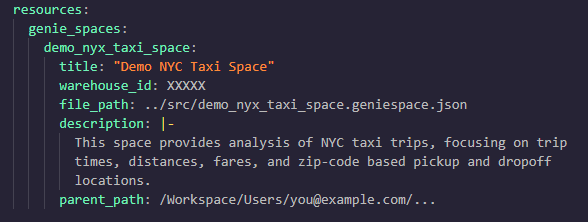
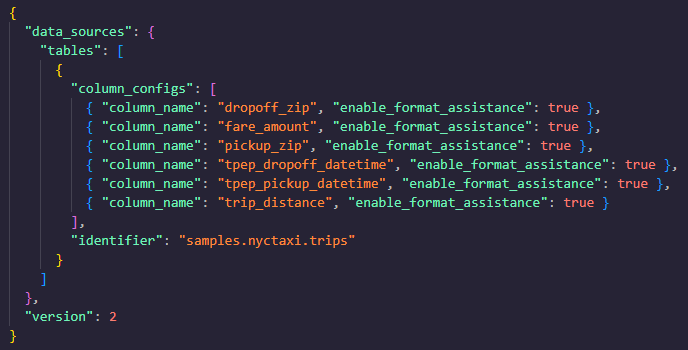
The .json is the space itself, serialised into a json string. This is the bit the UI normally owns and has caused so much friction in deployments over the past year or so. And for our NYC taxi example, it's pleasingly small:
However, here comes a big gotcha: you can't bind to an existing space.
This is the part that will probably catch a lot of people out. Bundles let you bind to many existing resources by ID, adopting them into the bundle. However Genie Spaces are currently not bindable (see the deployment bind docs to see if that's still true, these things change fast!).
The practical consequence is that the space you just generated from is now effectively a template, as is any pre-existing space you want to use in this fashion. The bundle does not adopt it, rather when you deploy the bundle it creates a brand new space from the definition. The same is true for any pre-existing, non-DAB space you might want to bring under control; generate reads it, but the bundle won't own it.
And why does this matter beyond a bit of tidiness? Well, if you deploy to the same parent path and with the same name as the original, you'll overwrite that original unbound space. The replacement is a new space with a new ID, which leads to new entries in the system tables, fresh usage stats, and an empty chat history. The conversations users had with the old space are gone.
So before you deploy, decide what you want to happen to the original you'll be overwriting. If it's just a throwaway you built to seed the bundle, overwriting it is fine. If it's an existing space people have been using and you care about its history for audit or archival purposes, deploy your new version to a different parent path or with a slightly different name, and retire the old one deliberately rather than having DABs silently erase it. Note that DABs will warn you before anything is permanently deleted in this manner and give you a chance to abort, but it's still good to plan ahead of time!
Deploy And Open
With that decided, deploy to dev and open it:
databricks bundle deploy -t dev databricks bundle open demo_nyc_taxi_space -t dev
Because the dev target is in development mode, the deployed space's title will show as [dev <your-name>] Demo NYC Taxi Space. That's expected, and won't propagate through to production, where titles will instead come out nice and clean.
Commit To The Git
Your space is now defined as code, so commit it:
git add resources/ src/ git commit -m "Add Demo NYC Taxi Genie Space"
And if you're a user who's been concerned about version tracking your genie rooms, that's the milestone! From here on out, the space's definition lives in git, and every future change to it goes through a diff and a commit like anything else.
Make It Portable
The generated resource is pinned to the warehouse ID and folder which you created it with, but these will change in different environments and workspaces. To deploy the same files to multiple environments unchanged, swap the hardcoded values for bundle variables, exactly as you would for any other bundle resource. The best way to do this for the SQL warehouses is by looking the warehouse up by name, so each environment resolves its own warehouse ID:
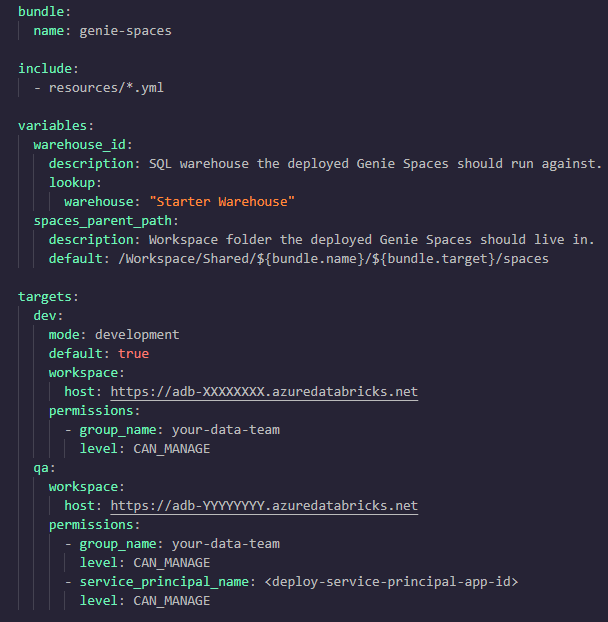
Then edit the resource file to use the variables. Because warehouse_id is resolved by a lookup on the warehouse name, the same file deploys cleanly to dev, QA and prod, where each target finds its own warehouse.
At this point, you may wish to validate before you go further, just in case you've missed anything or tried to reference a resource which doesn't exist!:
databricks bundle validate -t dev
One rule to quickly note which also bites people on promotion: the table identifiers inside the JSON must resolve in every workspace.
For example if your catalog and schema are named differently per environment, the space won't resolve after you promote it. Either keep catalog and schema names consistent across workspaces, or, more realistically, remap them in the JSON before committing by tokenising your names and swapping them out (ie, programmatically swap "dev_catalog" for "$CATALOG_NAME").
Keep The JSON In Sync With The UI
Here's where we finally deal with that "can't version control from the UI" message from earlier.
The .geniespace.json file is not editable through Databricks' built-in version control UI and, importantly, any edits you make to a deployed space through the UI do not flow back into your bundle JSON on their own. The two can silently drift apart.
The workflow is therefore edit in the UI, then regenerate. In practice, to pull your UI changes back into the local JSON, you run the following:
databricks bundle generate genie-space --resource demo_nyc_taxi_space--force
And while you're actively iterating on a space, let it sync live with the --watch flag, which polls for changes and pulls them in as you make them (see the visual modification reference for more info on this):
Running generate before deploy encourages you to treat git as the source of truth, make your edits in dev, and promoting them through. You should never hand edit a space directly in QA or prod, because the next deploy will overwrite it!
Review Your Changes In Git
This is the payoff. Because the space is now plain files, a git diff shows exactly what changed:
git diff src/demo_nyc_taxi_space.geniespace.json
Tweak an instruction in the UI, add a sample question, or bring in another table, and after the generate command runs again the change shows up cleanly in your git log, a real, reviewable history for a Genie Space, which simply wasn't a thing before.
Conclusion
That's the full loop: build a space in the UI to act as your initial template, generate it into two version controlled files, parameterise it so it travels between environments, deploy it, and keep the JSON honest with generate --watch.
From here it's a short hop to wiring the whole thing into a CI/CD pipeline that triggers on changes under resources/ and src/, and promotes a space from dev to QA to prod automatically, but that's a post in its own right.
The one thing to keep in mind once again is that pesky non-bindable behaviour. Plan your parent paths and names so a deploy never quietly overwrites a space whose history you care about, run generate before deploy, and the rest is the same clean, repeatable workflow you already get from your Bundles everywhere else!
Want to chat more Genie with us, or see how our solutions can help you get the most out of your data? Get in touch!