


Introduction
Deploying machine learning (ML) models into production can be challenging, as it requires careful consideration of various factors such as scalability, reliability, and maintainability. While developing an ML model is an exciting process, deploying it into production can be a daunting task. The challenges faced in productionising data science projects can range from infrastructure to version control, model monitoring to integration with other systems. This blog will take a look at how Azure Functions can simplify the deployment process, getting models into production quickly and robustly to maximise their value.
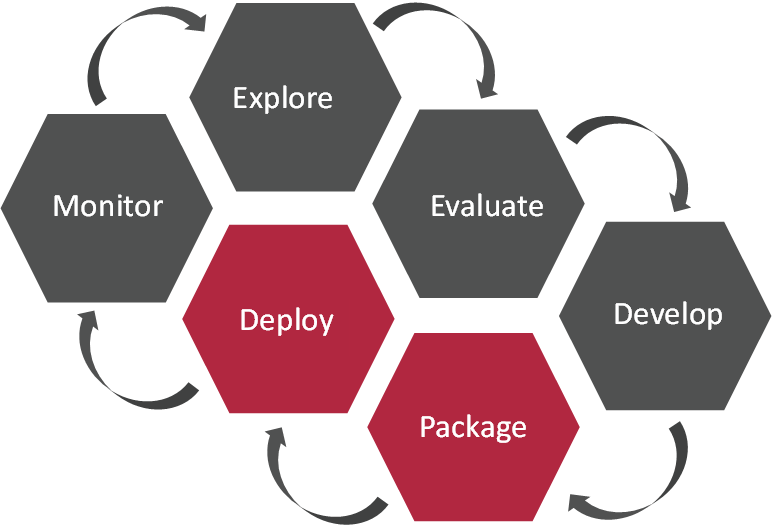
MLOps
Machine Learning Operations (MLOps) is the set of processes for the production ML lifecycle, essentially a way to efficiently and reliably deploy and maintain ML models in production. If you want to learn more about MLOps or the MLOps lifecycle then check out this awesome blog by Tori here!
Deploying a model using Azure Functions depends heavily on the output of the package step of the MLOps lifecycle. Packaging involves organizing all the necessary components of an ML model, including dependencies, configurations, and data artifacts, into a format that can be easily reproduced. Deployment, on the other hand, is the process of making the packaged model available to end-users in a production environment. It involves configuring the necessary infrastructure, such as servers, databases, and APIs, and ensuring that the model is running efficiently and reliably.
Real Time vs Batch
When it comes to deploying machine learning (ML) models, there are two primary deployment strategies: real-time and batch. Real-time deployment involves serving predictions in real-time, typically as part of an interactive application or API. Batch deployment, on the other hand, involves processing data in batches and generating predictions on a schedule, typically as part of a batch processing pipeline.
Real-time deployment is suitable for scenarios where immediate feedback is required, such as fraud detection or recommendation engines. In contrast, batch deployment is more suitable for scenarios where there is a delay in processing, such as processing customer data overnight to generate personalized recommendations.
Azure Functions
Azure Functions are a serverless compute service offered by Microsoft Azure, which enables developers to build and deploy event-driven, scalable solutions quickly and easily. With Azure Functions, developers can execute code in response to various triggers, such as HTTP requests, timers, or events from Azure services.
What makes Azure Functions a great tool for deploying machine learning models is their serverless architecture, which provides several benefits. Firstly, serverless architecture eliminates the need for managing infrastructure, allowing developers to focus on building and deploying their ML models quickly. Secondly, Azure Functions provide built-in scalability, automatically scaling up or down based on the incoming workload, ensuring that the deployed models can handle any load. Finally, Azure Functions are cost-effective, as they only charge for the time the code is executed, making it an attractive option for small-scale deployments and prototyping.
Moreover, Azure Functions can be integrated with other Azure services, such as Azure Storage, Azure Event Hubs, and Azure Cosmos DB, providing a comprehensive ecosystem for deploying and managing ML models. This integration enables developers to build end-to-end ML pipelines, from data ingestion to deployment, using a variety of Azure services.
A Basic Implementation
The below code example will take you through the steps of building a real-time HTTP endpoint for an existing ML model using Azure Functions. It will cover the basic steps required to read and pre-process data, then query the model and return a response. There are a few limitations of this method, but a future blog cover some more advanced tips and tricks to make your deployments even more robust!
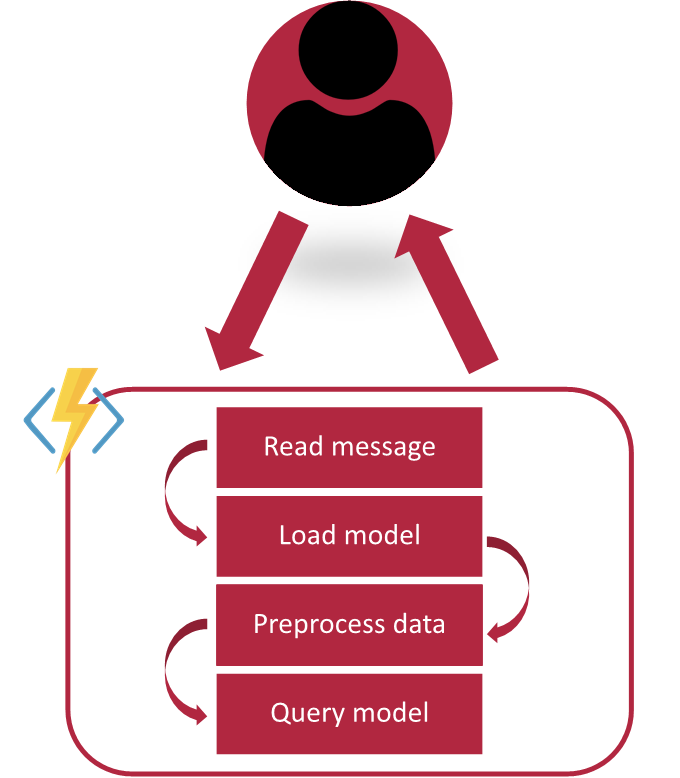
Function Flow
The flow for the function is very simple, a user will make a request to the HTTP endpoint for the function, which will then: read the message, load in the model, pre-process the data, and then query the model before returning a response with the result. Simple! The diagram below outlines those steps which run one after another.
First things first, import all of the necessary libraries! Next, in order to make the function responsive to the user it is important to send meaningful error messages if there is ever a problem during any of the operations so they understand what has gone wrong and if there is anything they can do to fix it. The below helper function has been created to keep the code clean and reduce the amount of duplicated code when returning a number of very similar responses.
import json
import logging
import os
import pickle
import azure.functions as func
import numpy as np

def return_error(msg: str) -> func.HttpResponse:
    """Function to create http response for any given error

    :param msg: The message to add to the response
    :type msg: str
    :return: Returns a HttpResponse for the relevant issue
    :rtype: func.HttpResponse
    """
    return func.HttpResponse(body=msg,
                             headers={"Content-Type": "application/json"},
                             status_code=500
    )
Read message
The first step of the process, in the main function of the code, is to attempt to read the input data sent as part of the users request. Fortunately that is easily achieved using the build in ‘get_json()’ functionality of the Azure Function HttpRequest object. It is important to wrap this in a try block to ensure that errors are handled correctly in cases where the user has failed to provide data, or has provided it in the wrong format, if an exception is thrown then a simple error message is returned telling the user that the function didn’t receive a json message so they know they either need to add one, or change the request body to json.
def main(req: func.HttpRequest) -> func.HttpResponse:
    logging.info('Python HTTP trigger function processed a request.')
    # Read the message body
    try:
        json_msg = req.get_json()
        logging.info(f"Json message recieved: {json_msg}")
    except ValueError:
        logging.error("No json message recieved.")
        return return_error("No json message recieved")
Load Model
The next step is to load in the pretrained model that will be used for the inference. In this example it is a pickled Random Forest model created using the SKLearn library. (If you want to code along with this example you can find the data, training scrips, and models in GitHub). There are better and more robust ways to load and version models, using tools such as MLFlow, but for this example we just want to get something up and running as quickly as possible. Again this is all wrapped in a try block so that if there is a problem the user has a little more detail on the issue.
# Load the model
try:
    model = pickle.load(open(f"{os.getcwd()}/models/Random Forest.pkl", 'rb'))
except Exception as e:
    logging.error(f"Failed to load model, {e}")
    return return_error("Failed to load model")
Preprocess Data
Once the data has been read, and a model has successfully been loaded, the data will need to be pre-processed into a format that will be accepted by the model. This will differ from model to model, but in this case it is as simple as extracting the values from the dictionary and reshaping the list into an array of 1x1 numpy arrays. As we have seen before, this is also all wrapped in a try block to allow for informative error messages to be returned.
# Preprocess data for the model
try:
    # Convert the input dict to a numpy array compatible with the model
    model_inpt = np.array(list(json_msg.values())).reshape(1,-1)
    logging.info(f"Model input: {model_inpt}")
except Exception as e:
    logging.error(f"Failed preparing data for model, {e}")
    return return_error("Failed preparing data for model")
Query Model & Return Response
The final step, once we have a model loaded and data in the correct format to pass into it, is to perform the inference. This is as easy as calling the predict() function from the SKLearn library and providing the input data. Once we get the prediction from the model, we created a nice output message that clearly displays the prediction, informs the user of the type of model it came from, and also provides the inputs back. This is then returned as a HTTP response and marks the end of this function! The only thing left to do is deploy the function to a function app and you will have a real-time end-point ready to go!
# Query the model
try:
    prediction = model.predict(model_inpt)
    logging.info(f"Prediction: {prediction}")
except Exception as e:
    logging.error(f"Failed to query model, {e}")
    return return_error("Failed to query model")

# Format output
output = {
            "Prediction": int(prediction[0]),
            "Model": "Random Forest",
            "Input": json_msg
            }

return func.HttpResponse(body=json.dumps(output),
                            headers={"Content-Type": "application/json"},
                            status_code=200
)
Conclusion
In conclusion, Azure Functions provide a powerful and flexible platform for deploying machine learning models in real-time. With its serverless architecture, built-in scalability, and integration with other Azure services, Azure Functions simplify the deployment process, allowing data scientists and ML engineers to focus on building and refining their models. Although a it provides quick and easy approach to model deployment the above code example overlooks things such as: proper model versioning and packaging, data validation, and performative code optimisations. However this blog is just to help you get started deploying your models and these issues will be addressed in a future blog, so check back soon!
If you want to see the full code implementation, and a few spoilers for the next blog in the series on advanced tips and tricks for using Azure Functions for model deployment you can find the GitHub repo here.